
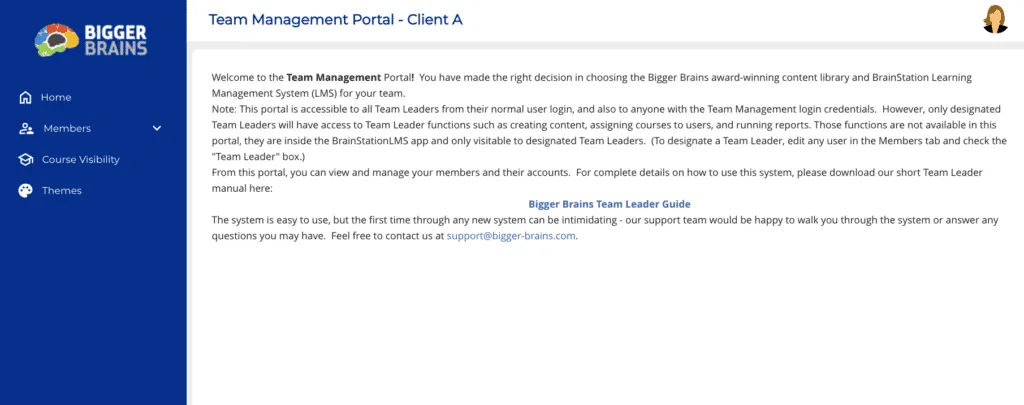
Disclaimer: We are currently in the process of migrating to a new UMS. While most functionality remains the same, updates are ongoing to ensure full functionality is available soon. If you have any questions about navigating the new UMS or completing activities within it, please contact our support team at support@bigger-brains.com for assistance.
Managing Users in multiple places can be a pain! Bigger Brains’ sync with Entra ID (Azure AD) allows you to add and remove Users in your Microsoft 365 environment and know that they will automatically be adjusted in your Bigger Brains account as well.
Inside our new UMS, there are two methods available to sync your Bigger Brains team with your Entra ID Users: Enterprise App or OAuth. If you are in our old UMS, only the Enterprise App option is available. There are pros and cons to each approach, but for most environments the OAuth approach will make the most sense.
Sync via Oauth #
First, you need to be signed into your Microsoft 365 (Entra ID) environment, with a User account that has sufficient rights to approve permissions for OAuth for your organization.
Note: If you are an IT consultant doing this on behalf of your client you’ll need to be logged into the client’s M365 tenant with an appropriate account.
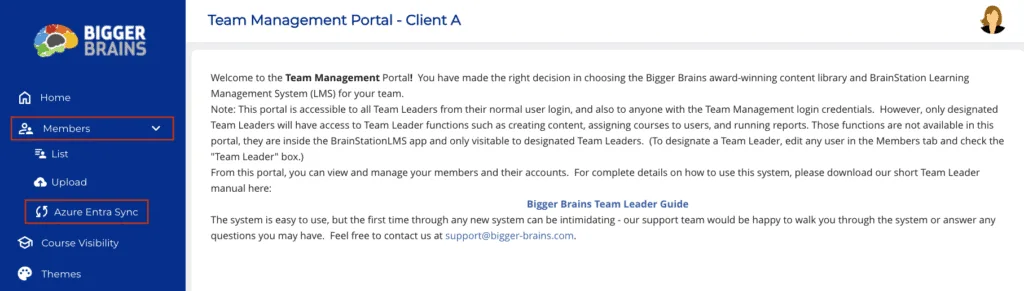
While logged into your Microsoft 365 account, sign into BrainStation and browse to the Team Leader menu. Choose ‘Manage Team’ to reach the Team Management Portal.
Click on ‘Members’, then ‘Azure Entra Sync’.
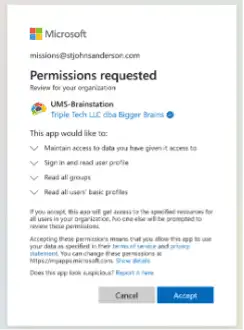
Click the “Connect Microsoft OAuth” button. A permission approval box should appear:
After Accepting the permissions, choose the Group or Users you wish to sync.
Best Practice: Create a Microsoft Group specifically for your training Users, and choose that Group here in the Oauth sync screen.
Checking the Auto-Sync checkbox will enable OAuth to add Users whenever a change is made in your Microsoft 365 environment. Checking the Allow Deletion checkbox will enable OAuth to also remove Users from Bigger Brains when they are deleted in your Microsoft 365 environment.
Click ‘Save’ to save your settings.
Return to this page anytime to make adjustments to your settings.
Syncing via the Enterprise App #
Overview:
- An Enterprise Application should be configured in your Microsoft 365 / Azure tenant.
- The Enterprise Application should be configured to expose the Entra ID endpoint, and necessary permissions to read the User data should be set.
- Using the Tenant ID, Client ID, and Secret we establish a secure connection from our application to your configured enterprise application to read and import the Users.
- Choose the Azure Group you wish to sync.
Prerequisites:
- A global administrator account or appropriate role administrator account.
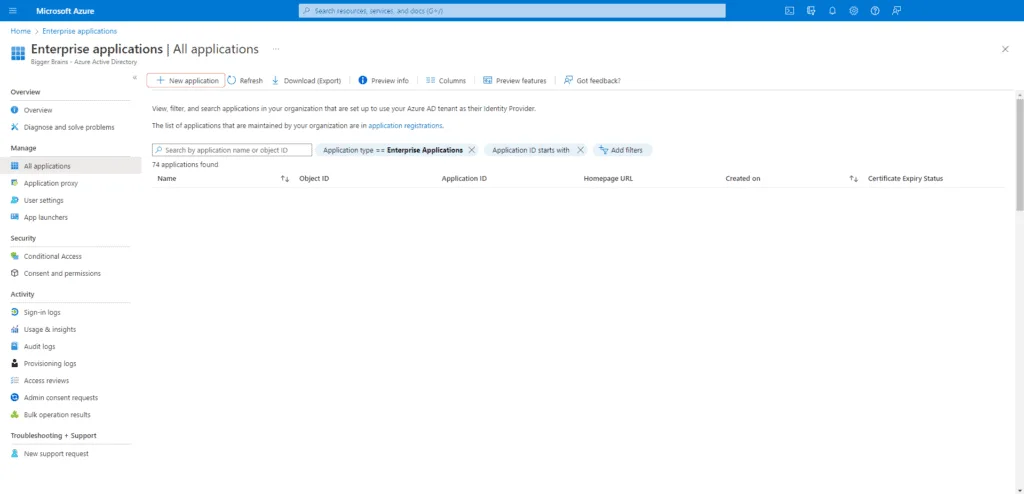
Create an Enterprise Application #
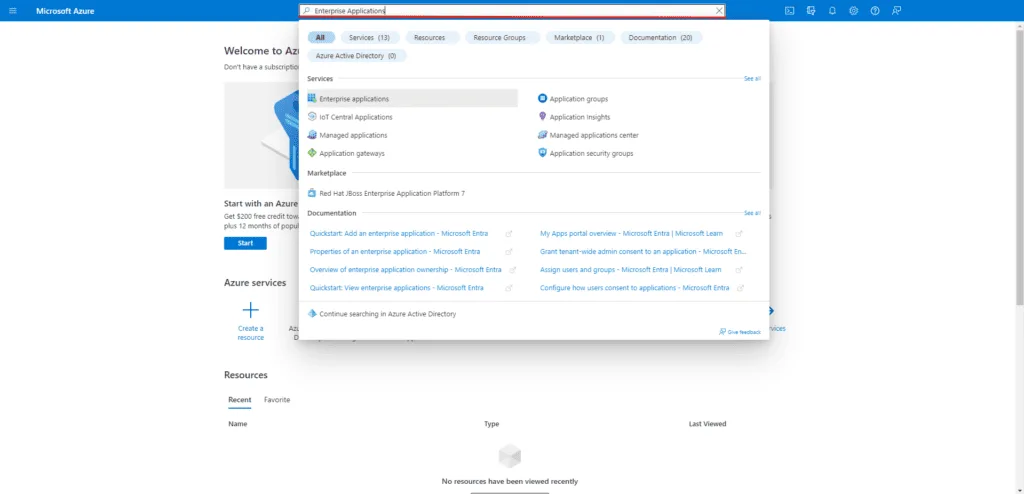
Start by logging in to the Entra portal. Once you have logged in, click into the search bar and search for ‘Enterprise Applications’ as seen below.
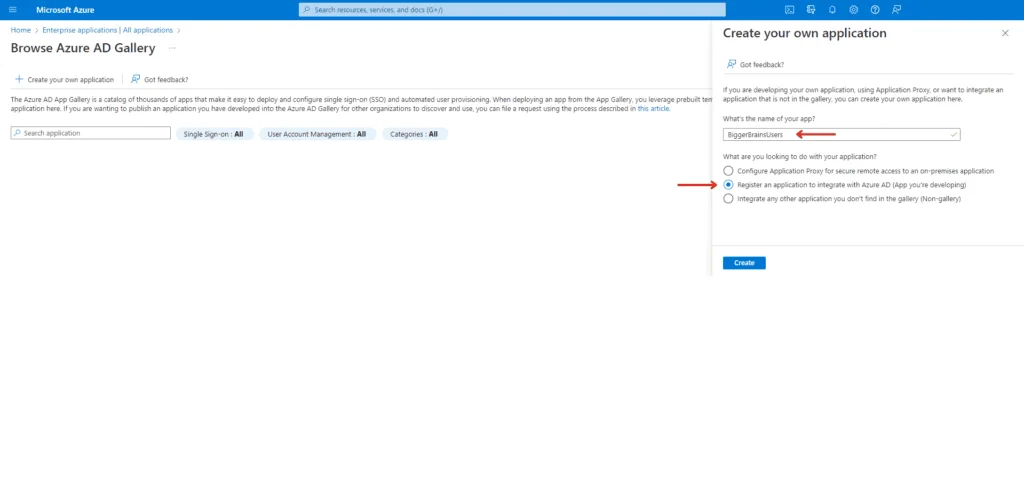
In your Entra portal, create an enterprise application by selecting ‘New Application’ and then ‘Create your own Application’.

You can give the application a name of your choice, but for easy reference, let’s call it ‘BiggerBrainsUsers’. Select ‘Register an application to integrate with Azure AD (App you’re developing)’.
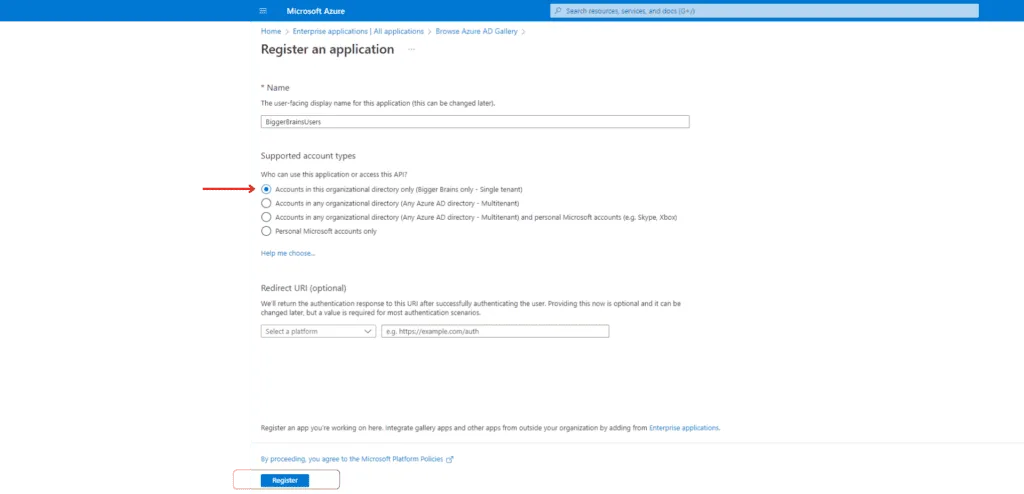
Protect access to this application to be within the account by choosing the option ‘Accounts in this organizational directory only (Single tenant)’. After completion of the configuration, you will be provided with the required tokens/ IDs to authenticate and access it from outside the account.
You do not need to change anything in the ‘Redirect URI’ section of this page. Once you have made the proper actions, click the ‘Register’ button from the bottom left corner.
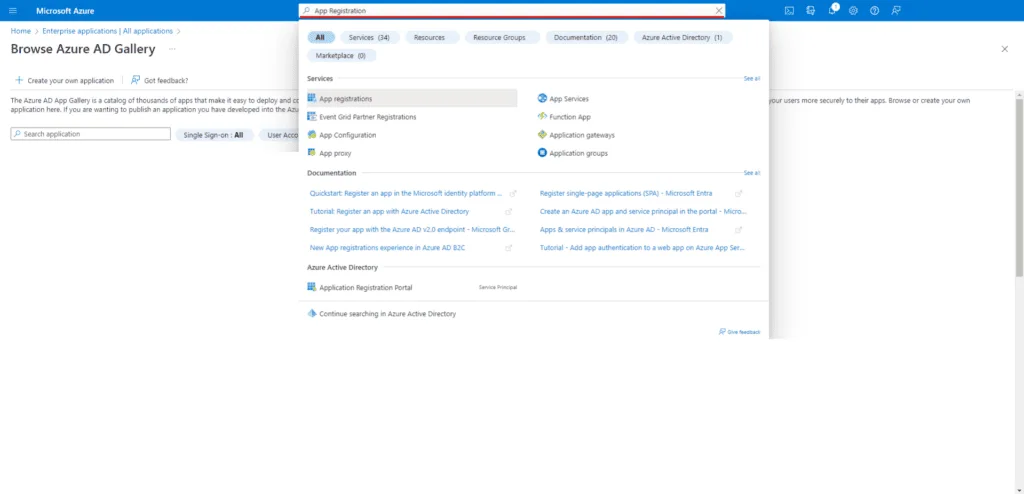
The above three steps created an ‘Enterprise Application’, and we now need to configure it to say what this application should do. In Entra terms, this is known as ‘App Registration’.
App Registration #
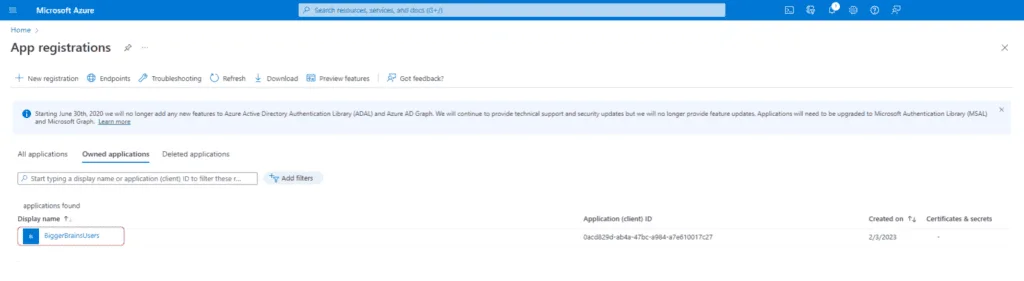
In the search bar at the top of the screen, search for ‘App Registration’ as seen below. Click on ‘App registrations’ from the search menu.
From the App registrations page, you should be able to see the application, ‘BiggerBrainsUsers’, under the ‘Owned Applications’ tab.
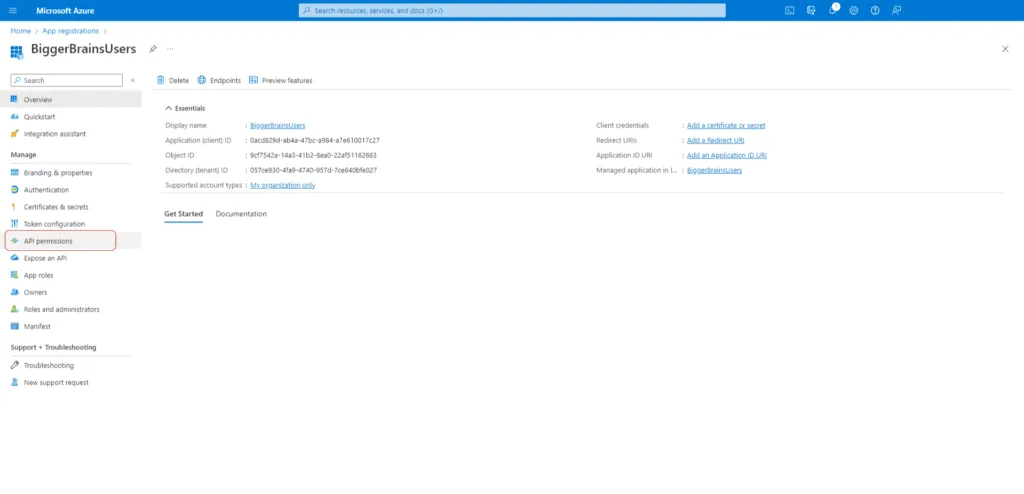
Select the application and click on ‘API Permissions’ from the ‘Manage’ menu on the left side of the screen. Here, we can choose the access level this application will have.
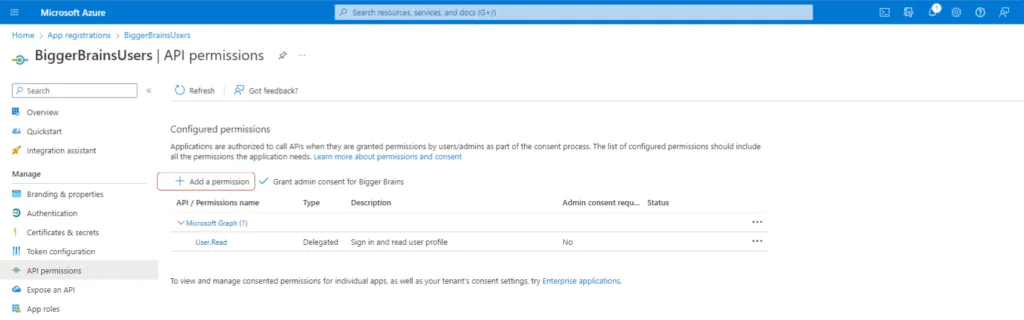
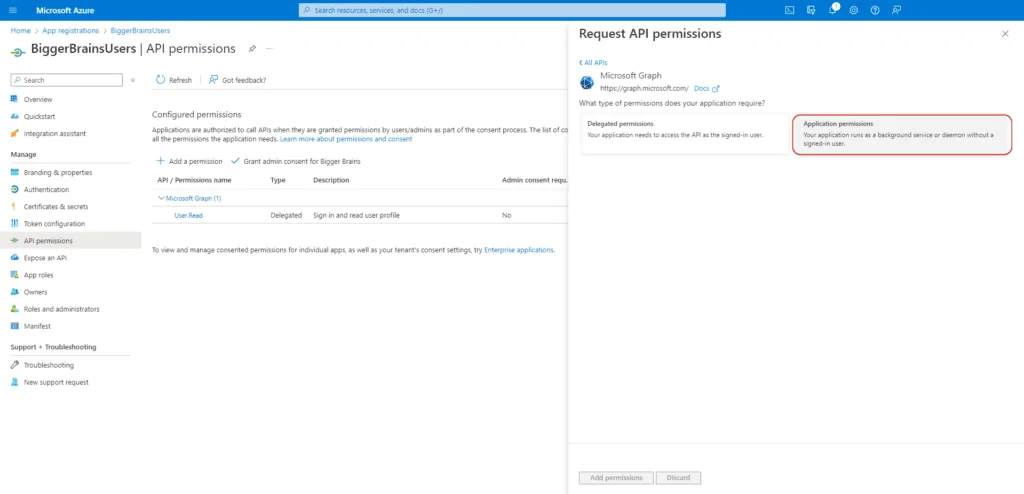
To choose and add permissions, click on ‘Add a permission’, and from the pop out screen, select ‘Microsoft Graph’.
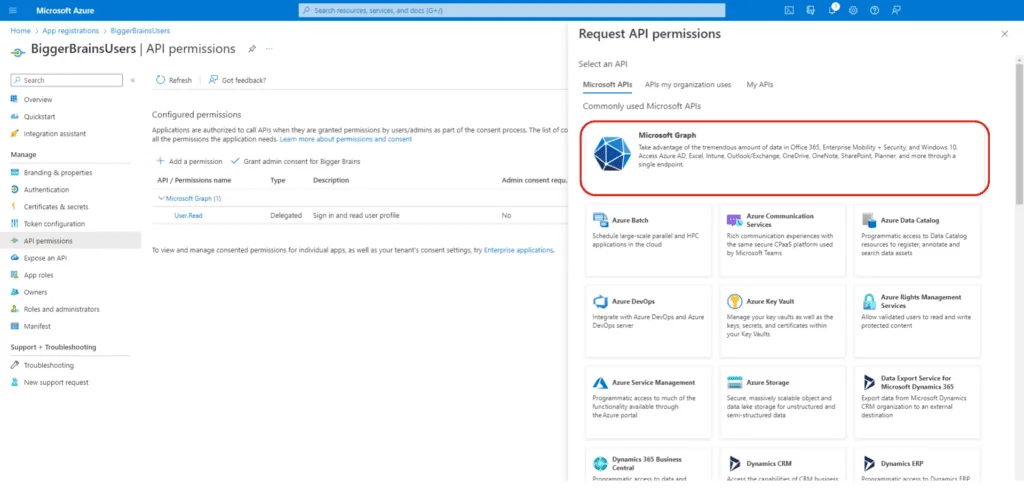
In the next screen choose ‘Application permissions’.
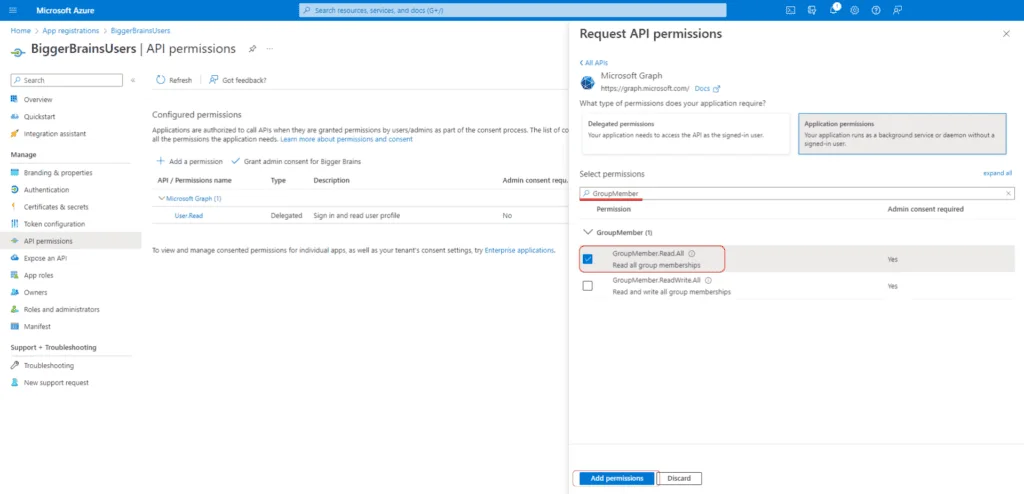
Finally, we will also need Group Members information, and to enable the access search for ‘GroupMember’ and select ‘GroupMember.Read.All’. When complete, click the ‘Add Permissions’ button to add all the previously selected permissions to this application.
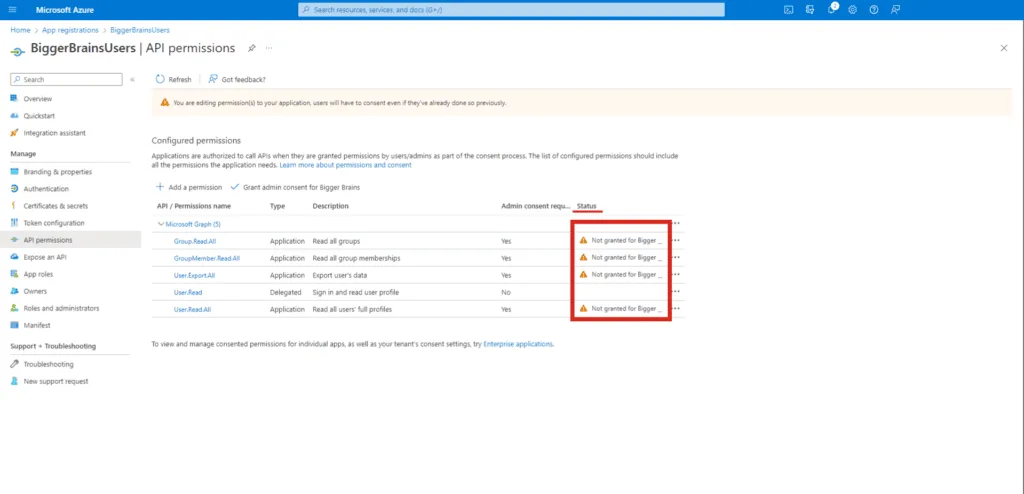
Ensure the application can access the configured permissions by checking the ‘status’ column. As highlighted below, you may see a warning message indicating that consent is needed to grant access.
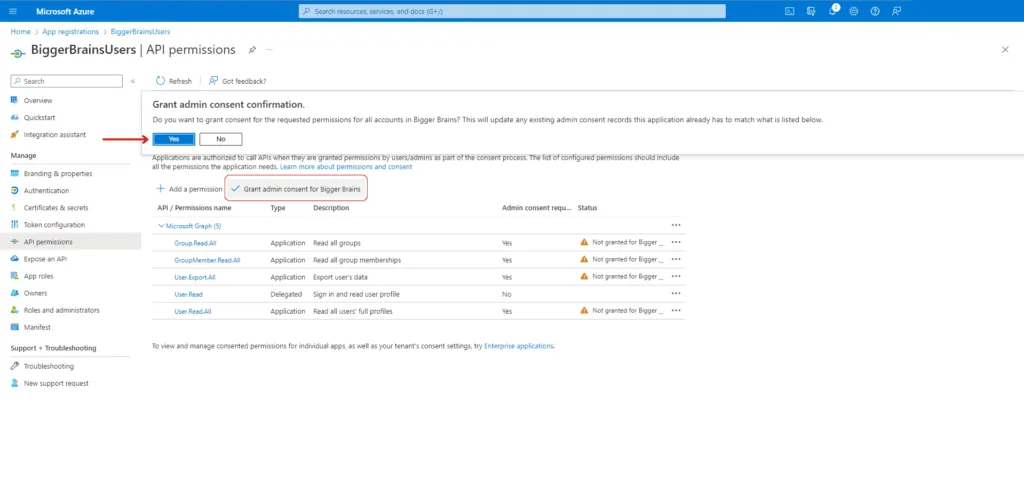
To ‘Grant Access’ you can click on ‘Grant admin consent for <Application Name>’ (<Application Name> is the placeholder here). A pop-up box will ask for confirmation of this action. Select ‘Yes’. Upon granting access, the status should change and inform you that access has been granted for Bigger Brains.
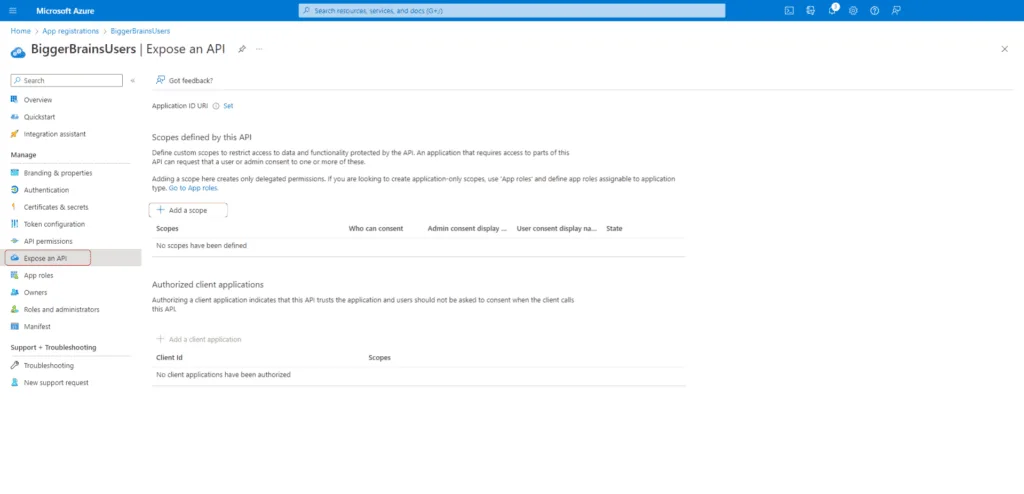
Add a Scope #
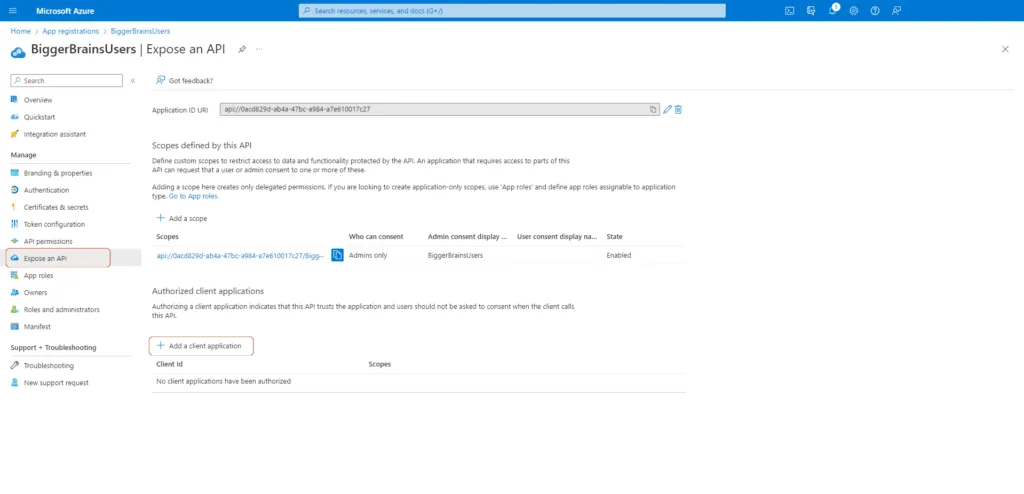
We now need to add a scope to restrict access to data and functionality protected by the API. Click on ‘Expose an API’ from the ‘Manage’ menu in the left sidebar. Further, click on ‘Add a Scope’. You will be presented with an Application ID URI from a pop out menu. Select ‘Save and Continue’ and proceed.
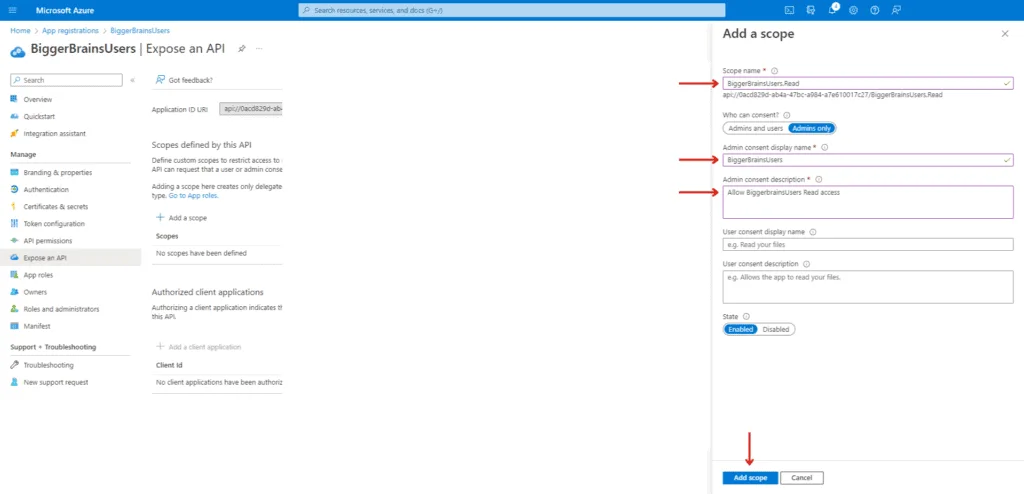
Give the scope a name, as programmatically this name will be presented to the client internally. For easier reference, you can use ‘BiggerBrainsUsers.Read’ as scope name, ‘BiggerBrainsUsers’ as Admin consent display name, and ‘Allow BiggerBrainsUsers Read access’ as Admin consent description. Select ‘Add scope’ to enable these restrictions.
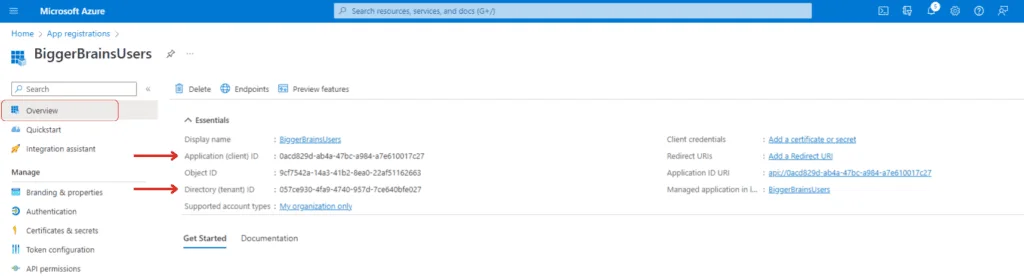
We are now almost ready with the configuration. To make things work, we need to know the ‘ID’ of the application which can be obtained from the ‘Overview tab’ in the left sidebar menu.
The Overview tab can be found below the search box in the left sidebar menu. Make a note of the ‘Application (client) ID’, and ‘Directory (tenant) ID’ as these will be important later. You can copy these items to your clipboard by hovering your cursor over the information until a ‘Copy to Clipboard’ options pops up.
Add a Client Application #
Click on ‘Expose an API’ from the ‘Manage’ menu in the left sidebar and click on ‘Add a client Application’.
Paste the ‘Application (client) ID’ copied in the previous step and select the ‘Authorized scope’. Select ‘Add Application’.

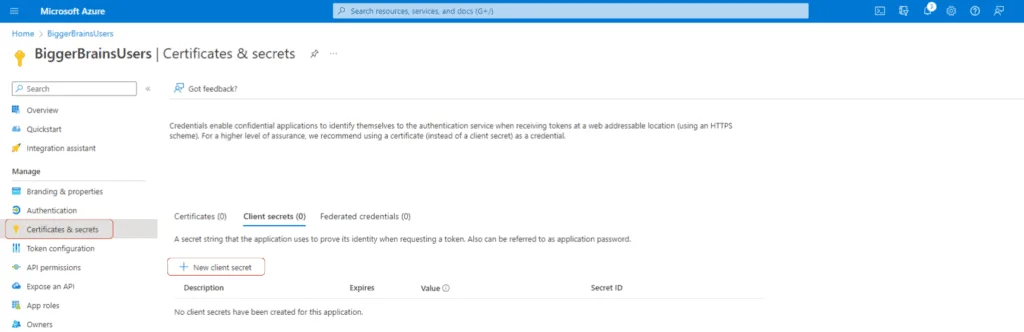
Add a Client Secret #
We now move to the final few steps to configure a certificate and associate it to the application to ensure the connections are securely established.
Click on ‘Certificates and secrets’ in the ‘Manage’ menu on the left sidebar. Select ‘New client secret’.
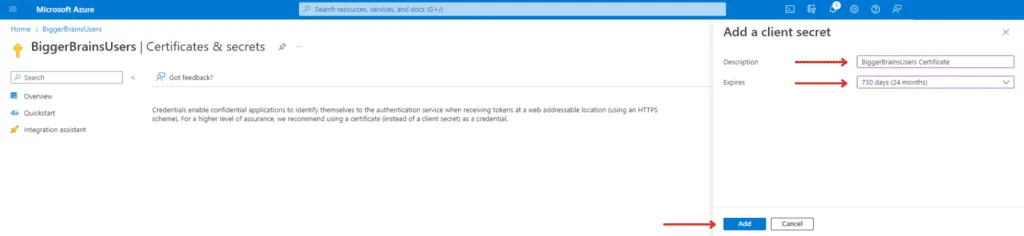
In the pop out menu, you can add a Description and an Expiry date. Enter a ‘Client secret name’ in the Description field, in this case we are using ‘BiggerBrainsUsers Certificate’. Choose the Expiry date to be the maximum possible days/months, so that you don’t have to renew it often. In most cases, this will be the ‘730 days (24 months)’ option. Select ‘Add’ from the bottom left.
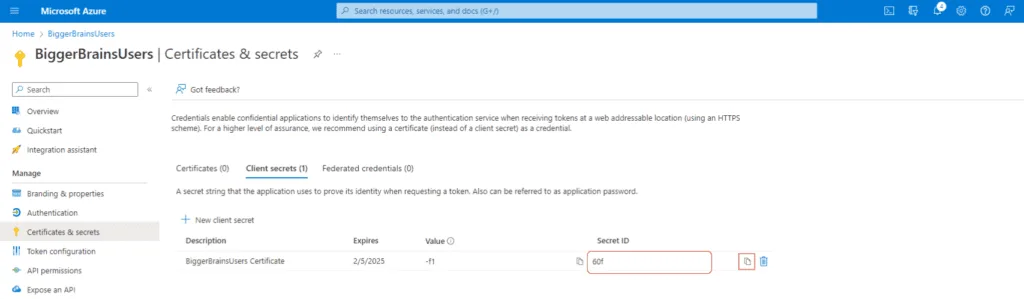
Upon creating the certificate secret, it will display a ‘Secret ID’. Copy it over to a safe location, as you will need this secret value to be entered in the ‘Bigger Brains Team Management Portal’ to import Users. You can copy this value by clicking the ‘Copy to clipboard’ button next to the ‘Secret ID’.
Importing / Syncing Users with Your Team #
Once the previous step is completed, open the ‘Bigger Brains Team Management Portal’. This can be done in either of the following two ways.
- If you are a Reseller, in the ‘Reseller Portal’ on the ‘Teams’ tab, click the “Go to Team’ icon next to the Team you want to connect to.

- For Team Leaders, log in to ‘BrainStation’ with you normal User account and click ‘Manage Team’ from the ‘Team Leader menu’.
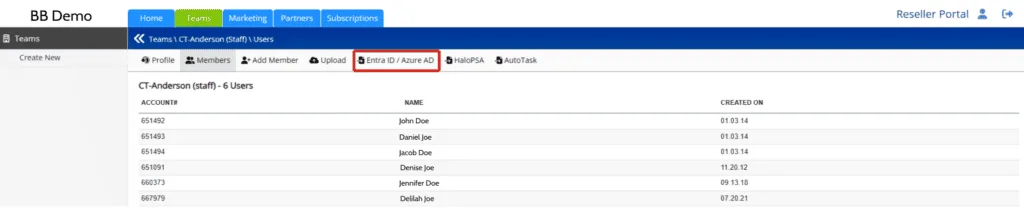
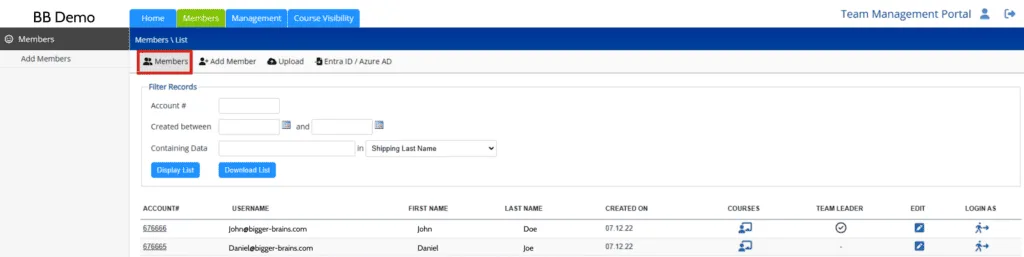
From here, click on the ‘Members’ tab.
Select the option ‘Entra ID / Azure AD’ from this screen (or in the ‘Add Members’ screen).
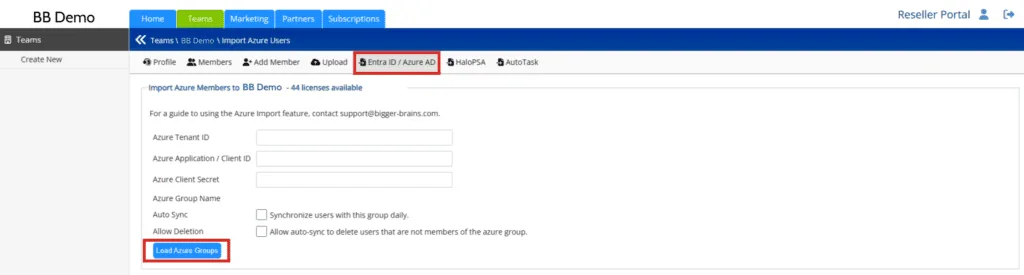
From here, enter the ‘Tenant ID’, ‘Client ID’, and ‘Client Secret Value’ to the correlating fields.
Note: We recommend NOT selecting the ‘Auto Sync’ or ‘Allow Deletion’ checkboxes until after your first import.
Click ‘Load Azure Groups’. This will display a list of all groups found in the associated Azure tenant, including the “All Users”.
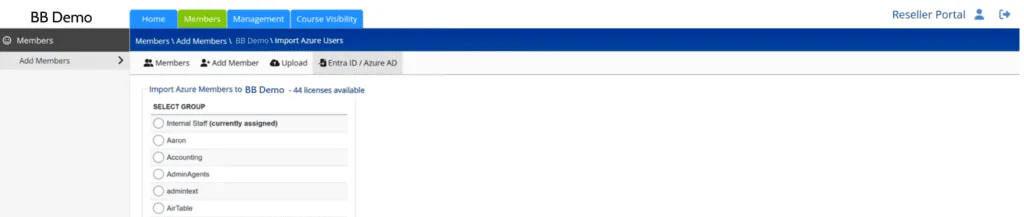
Choose a specific group, or choose the ‘All Users’ group to see all Users in this Azure tenant.
Note: The group you are choosing here will also be the group which you can choose to AutoSync with later, but this can be changed at any time.
The following screen will show all Users in the selected Group. Next to each User will be an open checkbox, a green check, or a red “No” symbol (Ø).
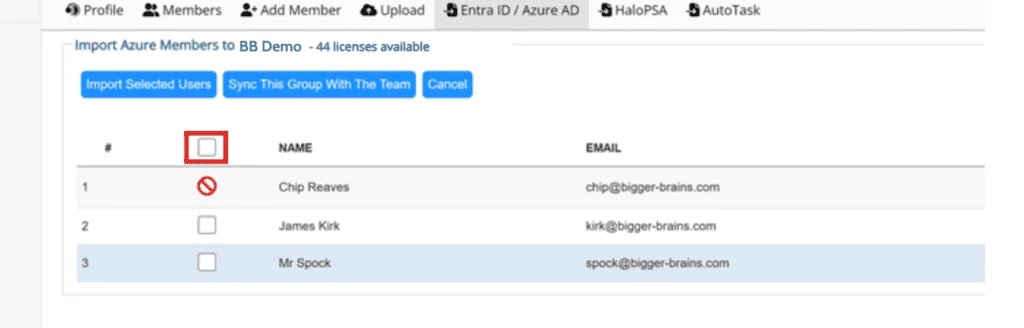
- A green check indicated this User is already a member of this Team.
- The red Ø symbol indicates this User cannot be imported, either because they are a member of another Team in Bigger Brains or because there is an error with their User account in Azure.
At this point you can decide to either Import selected Users, or to Sync this entire Group with the Team. Let’s look first at the Import option.
Use the open checkboxes to select which Users you would like to import to this Team. Use the ‘Select All’ checkbox at the column to select all available Users.
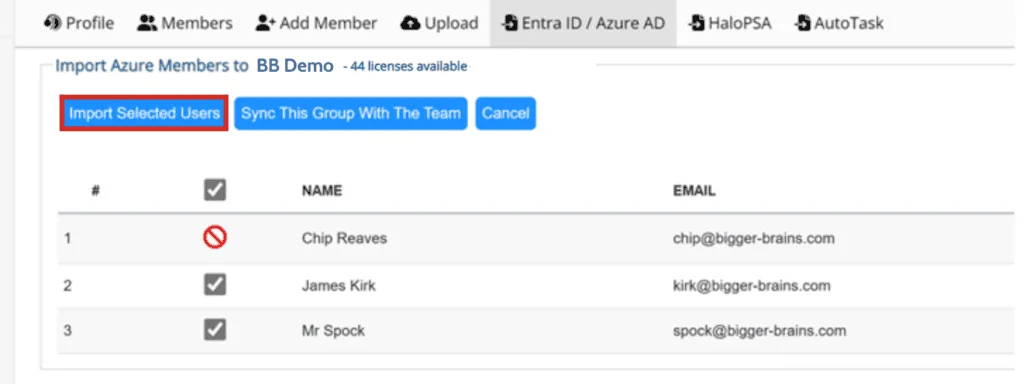
Once you have selected the Users you would like to import, click the ‘Import Selected Users’ option. This will add the selected Users to your Team, and display the updated results on screen.
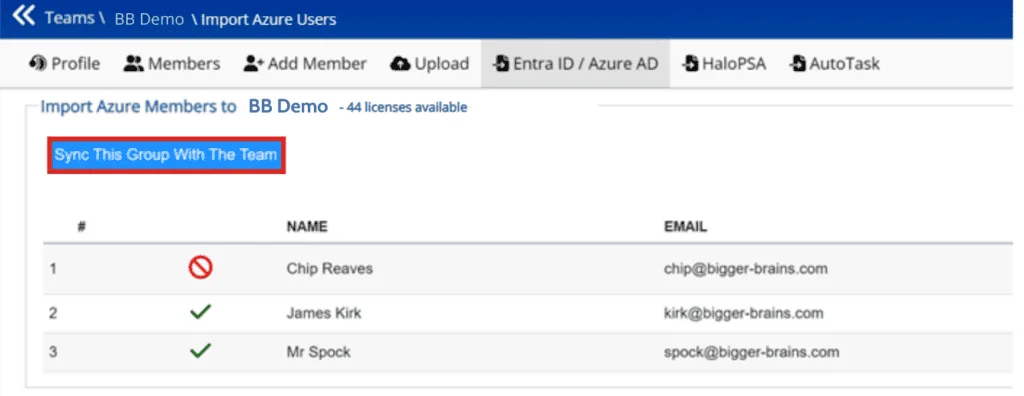
From this screen you can choose to Import additional Users (if any), or you can use the ‘Sync thisGroup’ button to start a daily Sync between this Group in Azure with the Team in your ‘BiggerBrains portal’.
Note: Whenever a Group Sync is active, it will include ALL Users in this Group, so selecting specific Users does not change anything. If you do not choose the Sync button here, you can also choose it from the Entra ID screen.
Click ‘Members’ to view the current Users who are now members of this Team in Bigger Brains.

Sync Options #
The Azure Group sync feature can be enabled in two places:
- By clicking the ‘Sync This Group’ button when importing Users.
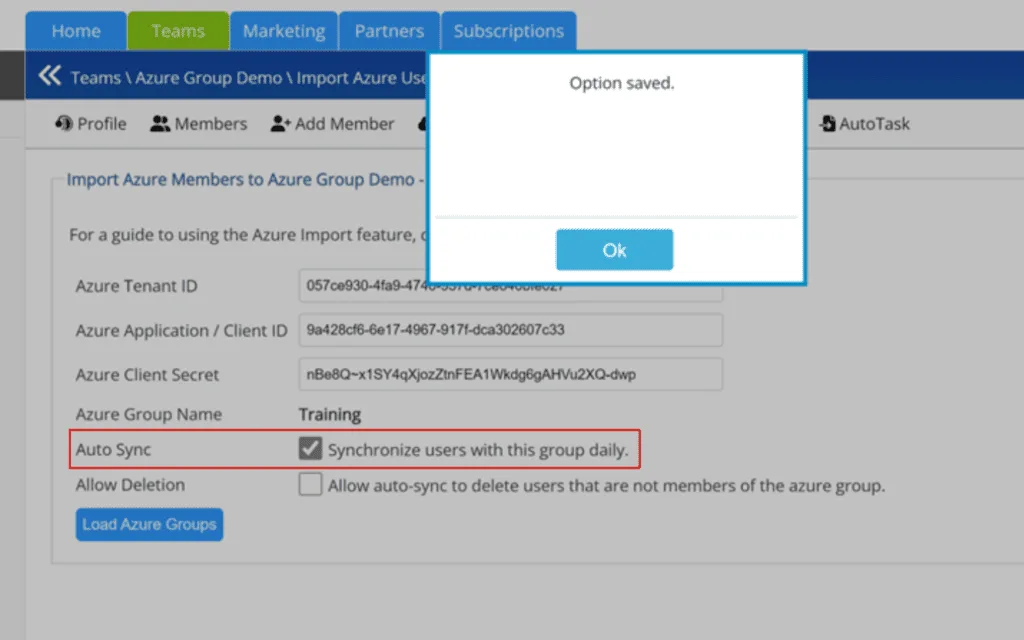
- By checking the ‘Synchronize Users with this group’ in the Entra ID screen.
When you check the ‘Synchronize’ button from the Entra ID screen, a pop up message will tell you this option is now saved.
To disable the sync, just unselect this box at any time.
There are some important things to note about the Bigger Brains Group Sync feature:
- When Group Sync is enabled, ALL Users of the Group in Azure will be synced to the Team in Bigger Brains, not just selected Users.
- The Sync occurs once per day, so adding Users to an Azure Group will not immediately reflect in Bigger Brains. For an immediate result you can return to the Entra ID feature page any time to import new Users immediately.
- By default the Sync feature will ADD any new Users which exist in Azure but not in this Bigger Brains Team. However it will NOT delete Users which exist in your Bigger Brains Team but not in Azure. Depending on your use case this can result in some amount of inactive Users taking up licenses in your Bigger Brains Team over time.
- There is a separate checkbox to allow auto-sync to delete Users which do not exist in the Azure Group.

This can be very helpful as it means all User management is done from within Azure / Microsoft365. With both boxes selected, any Users added to this Group in Azure will be added in Bigger Brains, and any Users removed from the Azure Group will be removed from Bigger Brains, on the next daily sync.
Suggested Uses for Sync #
- If your Bigger Brains Team includes Users who are not in your Azure Group, for example contractors or other external Users, then you should not check the box to allow auto-sync to delete Users, and you should expect to periodically manage Users manually in Bigger Brains to make sure appropriate people are still licensed.
- If your goal is to manage all Users in Microsoft 365 / Azure, then select both the Synchronize Users checkbox and the Allow auto-sync to delete checkbox. When doing this, choose or create a specific Group in Azure which is designated for managing this resource. For example, creating a Team called “Training” in Microsoft Teams will also create a Group with the same name, and if both checkboxes are selected for that Group in the Bigger Brains Entra ID sync feature, then all User management can be done from Teams (or Azure) without needing to access the Team Management pages in Bigger Brains at all.
Combined with the Bigger Brains eLearning app in Microsoft Teams, this can allow for a near fully native training environment inside your Microsoft Teams.


